Applications#
In Nokia Event-Driven Automation (EDA), applications are the packaging and delivery mechanism for everything that extends the platform beyond the core release. Each app is a versioned unit - described by a manifest, distributed as a single OCI image, and published through catalogs and registries.
The application package bundles custom resource definitions (CRDs), OpenAPI schemas, UI metadata, and the actual application code - so you can install, upgrade, and depend on features the same way you manage other software.
Installing an app extends the platform with the new resources, workflows, dashboards, and other features. The core EDA platform provides common services such as transaction model, device integration, EDA Store, and so on; apps, on the other hand, register additional resources that can be managed by EDA so you can declare intent for domains such as services, fabrics, timing, and so on. Those new resources brought by the apps appear in the API and UI where the app exposes them.
When a resource from an app is created, updated, or deleted - by a user, automation, or another app - the platform runs the application code shipped with that app to drive configuration and state handling. Some apps also deploy operator-based apps into the Nokia EDA Kubernetes cluster to integrate with external systems or run longer-lived reconciliation.
This plugin-based architecture allows for easy extensibility and customization of the platform without the need for a full platform upgrade.
Nokia EDA Store#
The Nokia EDA Store is used to manage the applications inside Nokia EDA. Nokia EDA Store relies on the following resources to manage apps:
- Catalogs: Nokia EDA app catalogs are a Git repository that contains the manifests of apps. The manifest contains all information needed to display the app in the Store UI and to perform the installation.
- Registries: Nokia EDA app registries are container registries that serve a OCI images of the apps. All of an app's content and code are contained in a single OCI image.
All apps available in the configured catalog(s) are displayed in the Nokia EDA Store UI. You can access the EDA Store page from the System Administration navigation panel and selecting Store. Nokia EDA Store displays all apps in a tile view, with high-level details for each app.
If the app is installed, the tile shows an Installed badge or an Updates Available badge if it is installed and there is a newer version available.
Clicking an app tile opens the app page from where you can easily perform an install, an upgrade, or view further information about the app.
Filtering for apps#
You can use the following fields to filter for apps:
-
From the Status drop-down list, select from the following options:
- All: displays all app packages know to Nokia EDA.
- Updates Available: displays apps for which an upgrade is available.
- Installed: displays all the installed apps in the current Nokia EDA deployment.
- Not Installed: displays all apps that are not installed.
-
To filter for apps by catalog, click the Catalog drop-down list.
- To display apps by category, click the Category drop-down list.
- To display apps by vendor, click the Vendor drop-down list.
Note
If an app is published in multiple catalogs, Nokia EDA Store displays this as a single app. This allows you to upgrade app versions across catalog boundaries. The catalog filter only applied to the title view. In the app details view, the versions list combined versions available in all catalogs.
App details#
From the Nokia EDA Store GUI, click any app to display details for that app.

This view provides the following information about the app:
- description of the app
- version of the app. To view other versions of the app, click the drop-down list
- vendor
- publish date
- supported operating system: click See More to display all supported operating systems. To view the supported versions for each operating system, see the Supported Operating Systems section in the Overview tab.
- category
- latest version
- installed version, if the app is installed
- link to documentation for the app, if the app is installed
The tabs shown in this view vary depending on the app.
- Overview: shows the Resource definitions and Workflow definitions that come with the app and details about the operating system supported.
- Required Applications: lists the required apps and if they are already installed; see App requirements for details.
- Changelog: provides release notes for some apps.
- Support: for some apps, provides links to where you can get more information.
- Licenses: provides licensing information for the app.
- Available settings: displays only for specific apps; see App settings for details.
Resource and workflow definitions#
The Overview tab lists the Resource Definitions and Workflow Definitions that are included in the app. These are the extensions to the Nokia EDA API delivered with this app:
- API Group, Kind, and Version
- A Title, which is used to identify these resources and workflows throughout the Nokia EDA UI
- API Access, which indicates how the resource definition to exposed on the Nokia EDA REST API (Value may be "None", "Read", or "Read Write")
- Associated script type ("Configuration", "State", or none) which indicates the type of Nokia EDA MicroPython script that is triggered by creating a resource of this kind, if any.
App requirements#
Requirements are dependencies on other apps that are defined in an app's manifest. The requirements must be satisfied for an app to be installed. The requirement of an app specifies a list of apps and version constraints (e.g. v3.0.*, >=v3.0.0).
The Nokia EDA Store calculates a full dependency tree of the app requirements, and a Target Version for each required app.
- For required apps already installed, the target version preferences the currently installed version.
- For required apps not yet installed, the target version preferences the latest compatible version.
When installing or upgrading an app via the Nokia EDA UI, any required apps that must be installed or upgraded together will be included with the app install. The install wizard lists all app installations and upgrades that will be included.
The Nokia EDA Store makes sure that all the app requirements stay valid at all times to prevent invalid app version configurations. If an app requirement can not be satisfied, such as when a required app is missing or version requirement conflict with the requirement or another app, installation will fail. Uninstalling apps may also be blocked if it breaks the requirement of another app.
Note
Apps also have dependencies on the Nokia EDA core platform version. Apps which are not compatible with your ENokia DA cluster display "(incompatible)" in the version drop down in the Store UI.
To view the dependencies for an app, from EDA Store click the app's tile to open its page, then click the Required Applications tab.
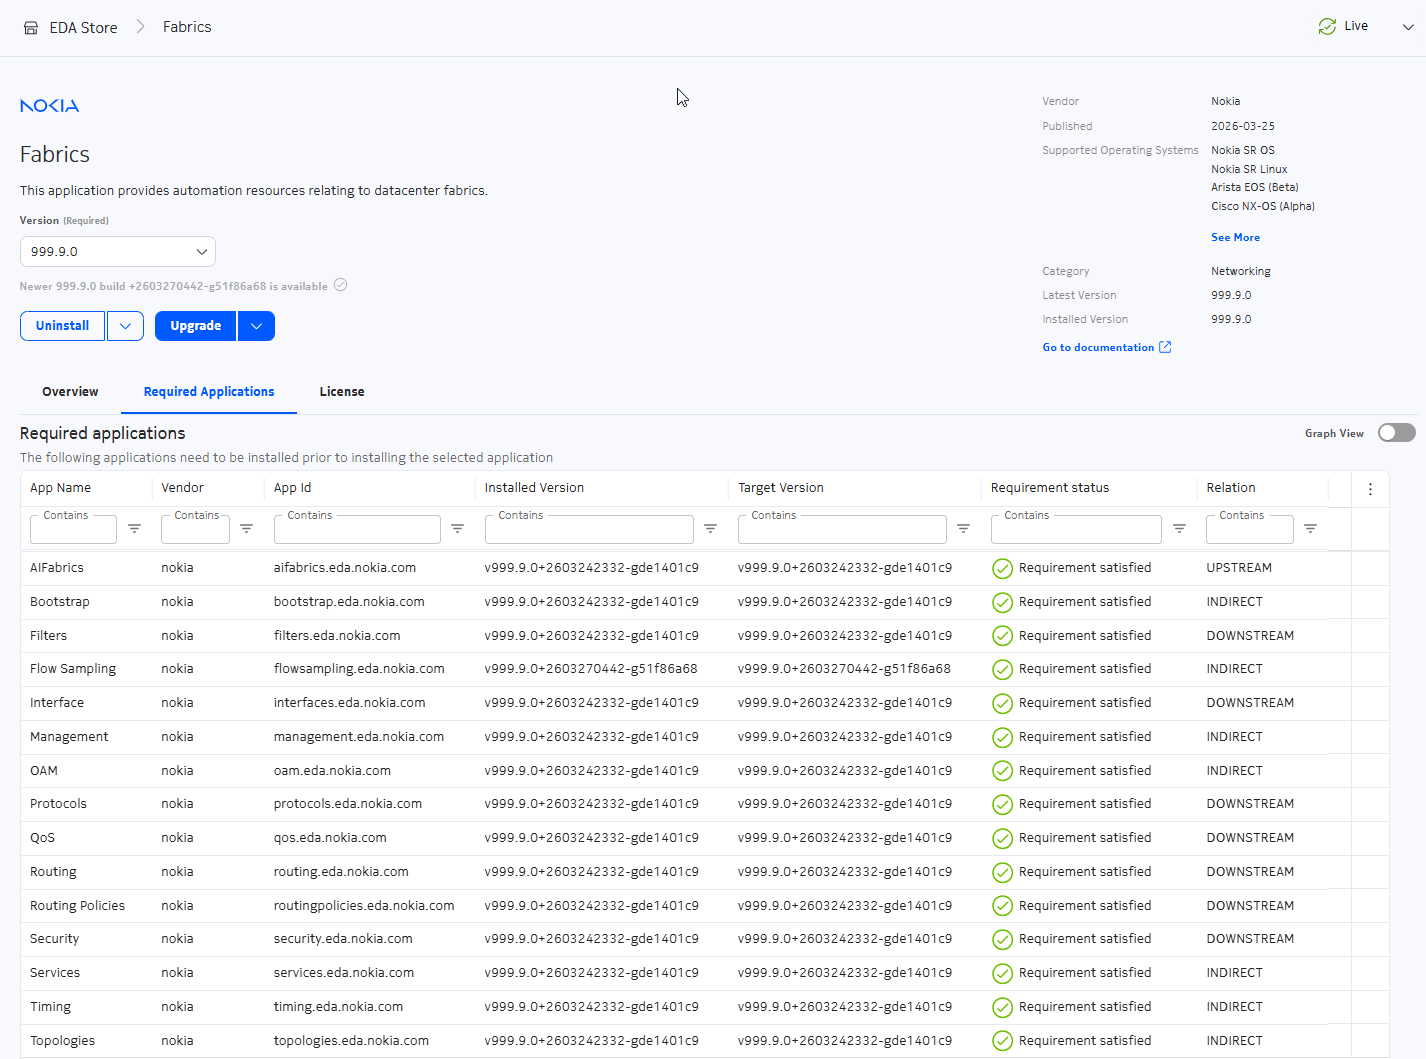
As shown in the example, requirements that are satisfied are checked. The Relation column shows dependencies with apps in the Required applications list:
- Downstream: these apps are required by the selected app
- Upstream: these apps require the selected app
- Indirect: these apps require the downstream apps or are required by an upstream app
For a graphical view of the app dependencies, click the Graph View toggle.

You can use the typical UI controls to:
- filter for downstream, upstream, or indirect relationships
- zoom in, zoom out, or reset the view
- toggle the orientation of the graph view
App settings#
If an app has fields that you can set during installation, the Available Settings tab shows the fields that you can set. App settings is commonly used to customizing the Kubernetes cpu and memory requests for apps which deploy controllers.

During app install, the installer wizard will prompt you to set these fields. This step can be skipped to accept default values.
After app installation, the tab is renamed Applied Settings.
Managing apps#
Installing apps#
Use this procedure to install an app or execute a dry run of the app installation. The steps for the installation and dry-run installation are similar. A dry-run installation downloads the application image and applies the app manifest as a dry-run transaction; this allows you to review the transaction result before proceeding with the app installation.
Procedure
-
From the System Administration navigation panel, select Store.
-
Click the app that you want to install.
-
In the app page that displays, you can install the app or a do a dry-run of the app installation:
- To install the app, click Install.
- To do a dry-run, click the drop-down list and select Dry-run
-
If the app is available from more than one catalog, a form displays from which you can select the catalog. After making a selection, click Install.
The flow of the installation varies depending on whether the app has requirements or associated settings:
- If the app has no outstanding requirements or associated settings, the system displays a Summary page with installation details and the procedure is complete.
- If the app has associated settings, the screens that display are shown in step 5. Follow the prompts to complete the installation.
- If the app has requirements, the screens that display are shown in step 6. Follow the prompts to complete the installation.
-
If the app has settings associated with it, the system displays an Installation Overview page that describes the installation process for this app.
-
From the Installation Overview page, click Next.

-
In the Installation settings page that displays, set the fields for your app.

Click Next.
-
From the Summary page, click Install to complete the installation.

The procedure is complete at this point.
-
-
If an app has requirements associated with it, the Summary page displays required apps. Click Install or Dry Run Install to complete the procedure. The system installs the app and any app required identified in the Summary page.
You can also install an app using kubectl command, using AppInstaller custom resource. The following example shows to install the Cloud Connect app:
The status of the workflow shows the progress of the installation. This Workflow resource initiates an app installer job. Once installed, a Manifest resource will be created and the Workflow is done (and the object may be deleted). To see the installed apps using kubectl, you can check their manifests:
Uninstalling apps#
Procedure
-
From the System Administration navigation panel, select Store.
-
Locate the app that you want to uninstall and click it.
-
In the app page that displays, you can uninstall the app or do a dry-run of uninstalling the app:
- To uninstall the app, click Uninstall.
- To do a dry-run, click the drop-down list and select Dry-run uninstall.
-
Click Uninstall or Dry run uninstall.
Note: If you are trying to uninstall an app that is required for another installed app, the system displays an error.
You can also uninstall an app using kubectl command, using AppInstaller custom resource with a delete operation. The following example shows how to delete the previously created Cloud Connect app.
Upgrading apps#
If an upgrade is available for an app, the app tile in EDA Store displays the Updates Available button.
Procedure
-
From the System Administration navigation panel, select Store.
-
Locate the app that you want to upgrade and click Updates Available on its tile.
-
In the app page that opens, click the version to which you want to upgrade in the Version drop-down list.
The Upgrade button displays.
-
You can update the app to the selected version or a do a dry-run installation of the selected version.
- To update the app, click Install.
- To do a dry-run of the upgrade, click Dry-run in the drop-down list.
-
If the app is available from more than one catalog, a form displays from which you can select the catalog. After making a selection, click Install.
The flow of the upgrade varies depending on whether the app has requirements or associated settings:
- If the app has no outstanding requirements or associated settings, the system displays a Summary page with installation details and the procedure is complete.
- If the app has associated settings, the screens that display are shown in step 6. Follow the prompts to complete the installation.
- If the app has requirements, the screens that display are shown in step 7. Follow the prompts to complete the installation.
-
If the app has settings associated with it, the system displays an Installation Overview that describes the installation process for this app.
-
In the Summary page, click Install.
-
In the Installation settings page that displays, set the fields for your app.
-
From the Summary page, click Install to complete the installation.
-
-
If an app has requirements associated with it, the Summary page displays required apps. Click Install to proceed with the installation.
Editing app settings#
Use this procedure to update the settings of an app after installation. This procedure is applicable only if the application has settings associated with it, as described in App settings.
Procedure
-
From the System Administration navigation panel, select Store.
-
Click the app for which you want to change settings, and click the Applied Settings tab.
-
Click Edit application settings, then click Next.
-
Update the needed settings.
Installation settings are unique to each app.
-
Click Install to complete the procedure.
Catalogs#
A catalog is a Git repository that contains the manifests of applications. A manifest contains all the details of an app needs to display the app in the Nokia EDA Store UI and for performing the installation. Nokia EDA Store builds a list of available apps using the manifests from all the catalogs registered in Nokia EDA.
In the Nokia EDA UI, you can view the configured catalogs from the System Administration > Catalogs page.
The Catalogs page displays all the catalogs available in EDA. You can double-click a catalog to view or edit its details.
Adding a catalog #
Procedure
-
From the System Administration navigation panel, select Catalogs.
-
Click Create.
-
Provide a name for this resource.
-
Configure the specifications for this catalog. Set the following parameters:
- Authentication Secret Reference: Provide the name of the Kubernetes secret that will contain the credentials to connect to the catalog. See Catalog credentials secret
- Description: Optional description of the catalog
- Refresh interval: how often the controller checks the remote catalog for updates
- Remote Type: select from the drop-down list
- Remote URL: provide the path to the catalog, the URL of the Git repo where the catalog resides
- Skip TLS Verify: by default, TLS verification is enabled; set this parameter to skip TLS verification
- Title: Catalog name, as it will appear in the Nokia EDA Store GUI
-
Click Commit to commit your change immediately or click Add To Basket to add this item to Transactions Basket to commit later.
Catalog credentials secret #
To create a catalog credentials secret, apply the following Secret in the Kubernetes cluster:
kubectl apply -f - <<EOF
apiVersion: v1
kind: Secret
type: Opaque
metadata:
    name: your-creds # A unique name
    namespace: eda-system # The Kubernetes namespace where EDA is deployed
data:
    username: <base64(username)> # Base64 encoded username
    password: <base64(password/token)> # Base64 encoded password/token
EOF
- Provide a unique name in the
namefield. This should match the Authentication Secret Reference in the catalog resource. - Provide the
namespacewhere EDA is deployed - Provide base64 encoded values for the
datafields.
Registries#
The app's code is stored in an Open Container Initiative (OCI) image. This image is stored in a container registry. This registry must be known to the Nokia EDA deployment so Nokia EDA Store can pull the image and use the data in the image to deploy the app. Registry resources configure registries available to the Nokia EDA Store.
In the Nokia EDA UI, you can manage registries from the System Administration > Registries page. The Registries page displays all configured registries in the Nokia EDA system.
Adding a registry #
-
From the System Administration navigation panel, select Registries.
-
Click Create.
-
Provide a name for this resource:
-
Configure specifications for this registry.
- Authentication Secret Reference: Provide the name of the Kubernetes secret that will contain the credentials to connect to the registry. See Registry credentials secret
- Remote URL: provide the FQDN or IP address for the registry. This setting should only contain the FQDN or IP address of the registry, not a URL path.
- Skip TLS Verify: enable this parameter to skip TLS verification
Registry credentials secret #
To create a registry credentials secret, apply the following Secret in the Kubernetes cluster:
kubectl apply -f - <<EOF
apiVersion: v1
kind: Secret
type: Opaque
metadata:
    name: your-creds # A unique name
    namespace: eda-system # The Kubernetes namespace where EDA is deployed
data:
    username: <base64(username)> # Base64 encoded username
    password: <base64(password/token)> # Base64 encoded password/token
EOF
- Provide a unique name in the
namefield. This should match the Authentication Secret Reference in the registry resource. - Provide the
namespacewhere Nokia EDA is deployed - Provide base64 encoded values for the
datafields.
App documentation#
Nokia EDA generates an app documentation web site, which is updated when apps are installed in the system. In the Nokia EDA UI, the link to app documentation is available from the UI pages of the resources definitions provided by that app. Click the Go to documentation link from a resource page, as shown in the following example:
