Navigation panel#
The Nokia EDA side panel navigation panel always includes a set of core items. As you install new apps, the menu items grow to include the resources provided by those apps.
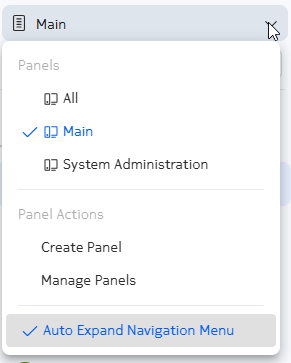
By default, The menu items are divided into two panels:
- Main: this panel contains the majority of options you can use to manage resources with Nokia EDA.
- System Administration: this panel contains options you can use to manage the Nokia EDA application itself, as well as user management and node management selections.
You can use the menu options to display the Main panel; or the System Administration menu; or select (All) to display items from both.
Pinning and un-pinning the panel#
Click the hamburger button at the upper left off the EDA UI to expand the menu horizontally and pin it open, or to un-pin it and allow it to collapse against the left edge of the Nokia EDA UI.

Menu categories#
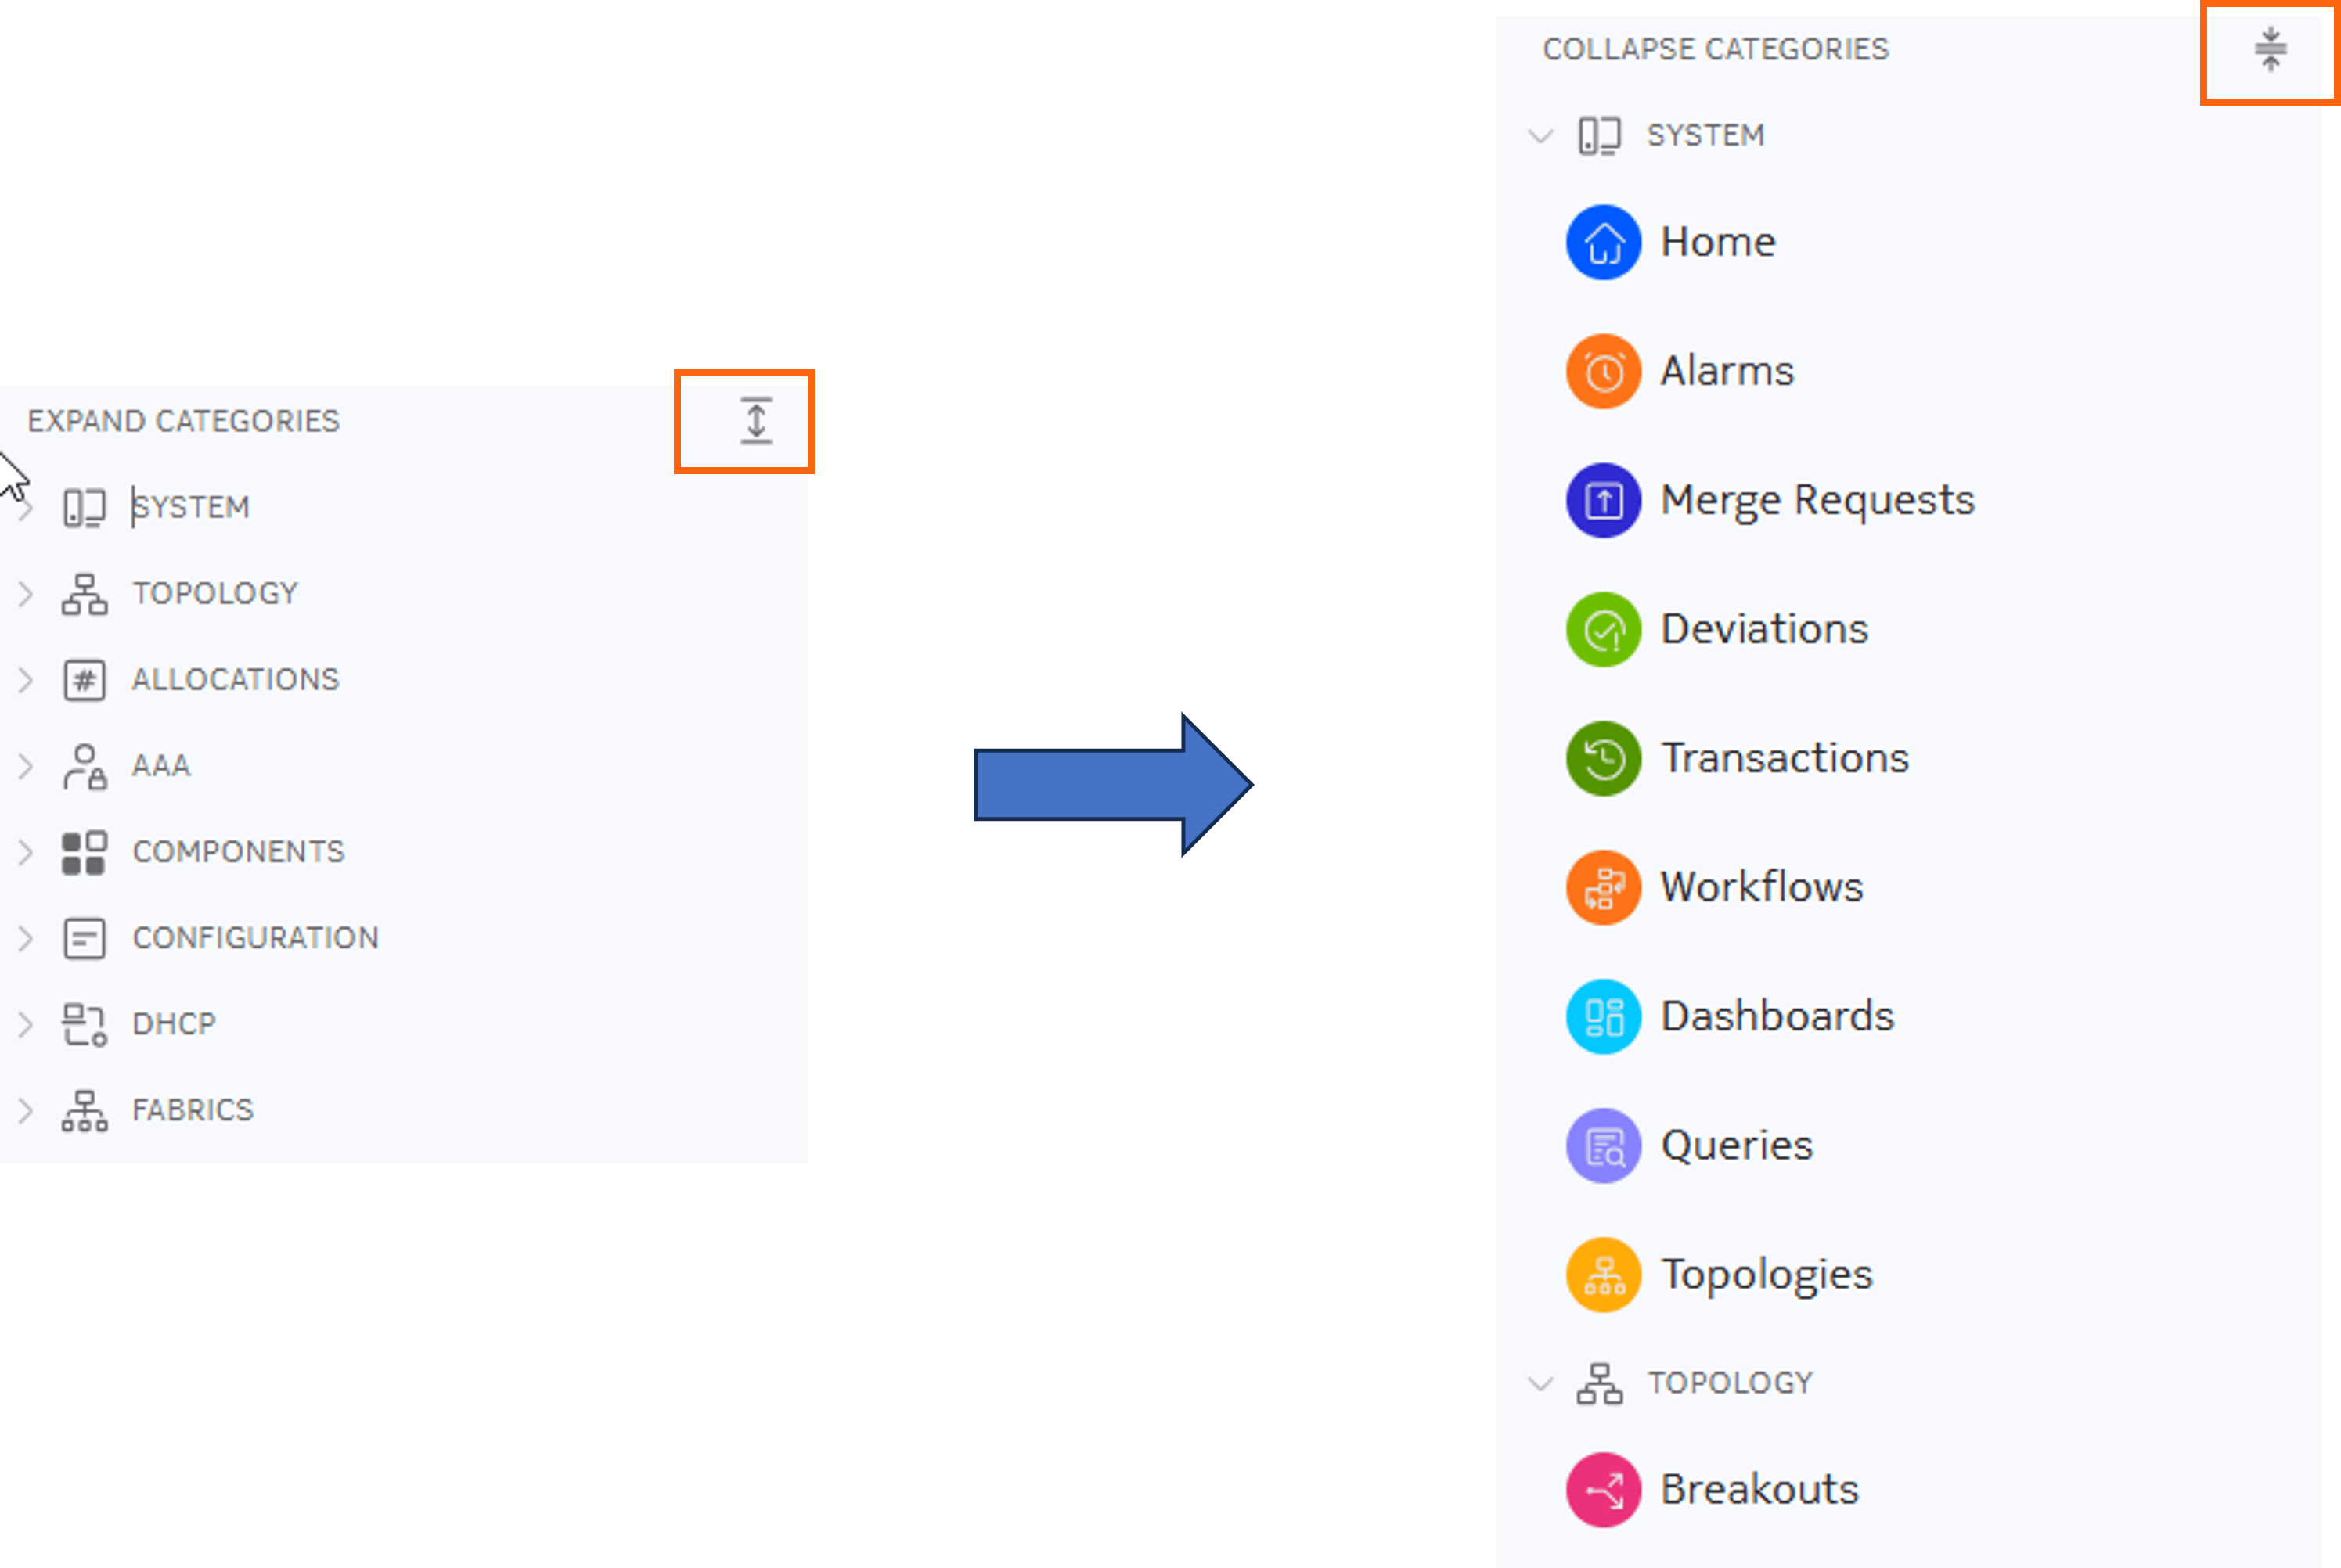
The navigation panel groups related items together into a set of categories.
- Menu categories appear in gray text and have an associated icon.
- Menu items appear in black text and have an associated circle containing an icon or letters.
You can vertically expand or collapse individual categories using the chevron beside the category title.
You can also expand or collapse all categories simultaneously using the EXPAND CATEGORIES or COLLAPSE CATEGORIES toggle near the top of the menu.
Searching the menu#
You can use the Search box to find all of the menu selections whose names include a particular string of text; the menu displays only matching options.
If your search matches a category name, all of the selections within that category are included in the search results (even though the selections themselves may not match your search string).
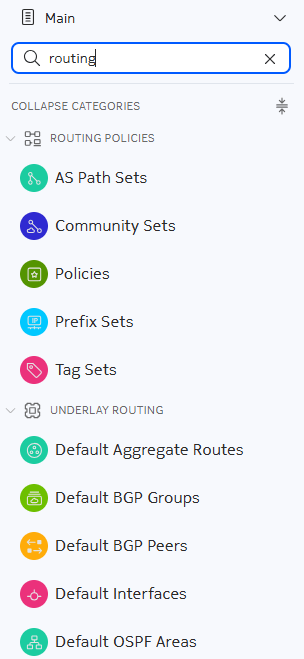
To clear the text within the Search field, click the X at the right of the field.

Custom navigation panels#
Nokia EDA allows you to create custom navigation panels containing only the categories and navigation links that you select. This allows you to customize the UI to the features you use most often, or even create multiple panels optimized for particular tasks.
Custom panels can also include links to saved EQL queries, and saved dashboards, and external URLs.
To further help you manage navigation, you can also show or hide any of the standard or custom Nokia EDA navigation panels.
Using the Manage Panels option in the Nokia EDA menu, you can:
- Duplicate an existing standard or custom navigation panel (a duplicated navigation panel generally serves as the starting point for creating a modified version of it)
- Edit or duplicate an existing custom panel
- Hide or show a standard or custom navigation panel
- Publish your custom panel with other Nokia EDA users
- Export a custom navigation panel as JSON file
- Import a custom navigation panel from a JSON file
Panel editor #
The panel editor is used whenever you:
- Create a new custom navigation panel
- Edit an existing custom navigation panel
- Duplicate an existing navigation panel, to modify it and save it as a new panel
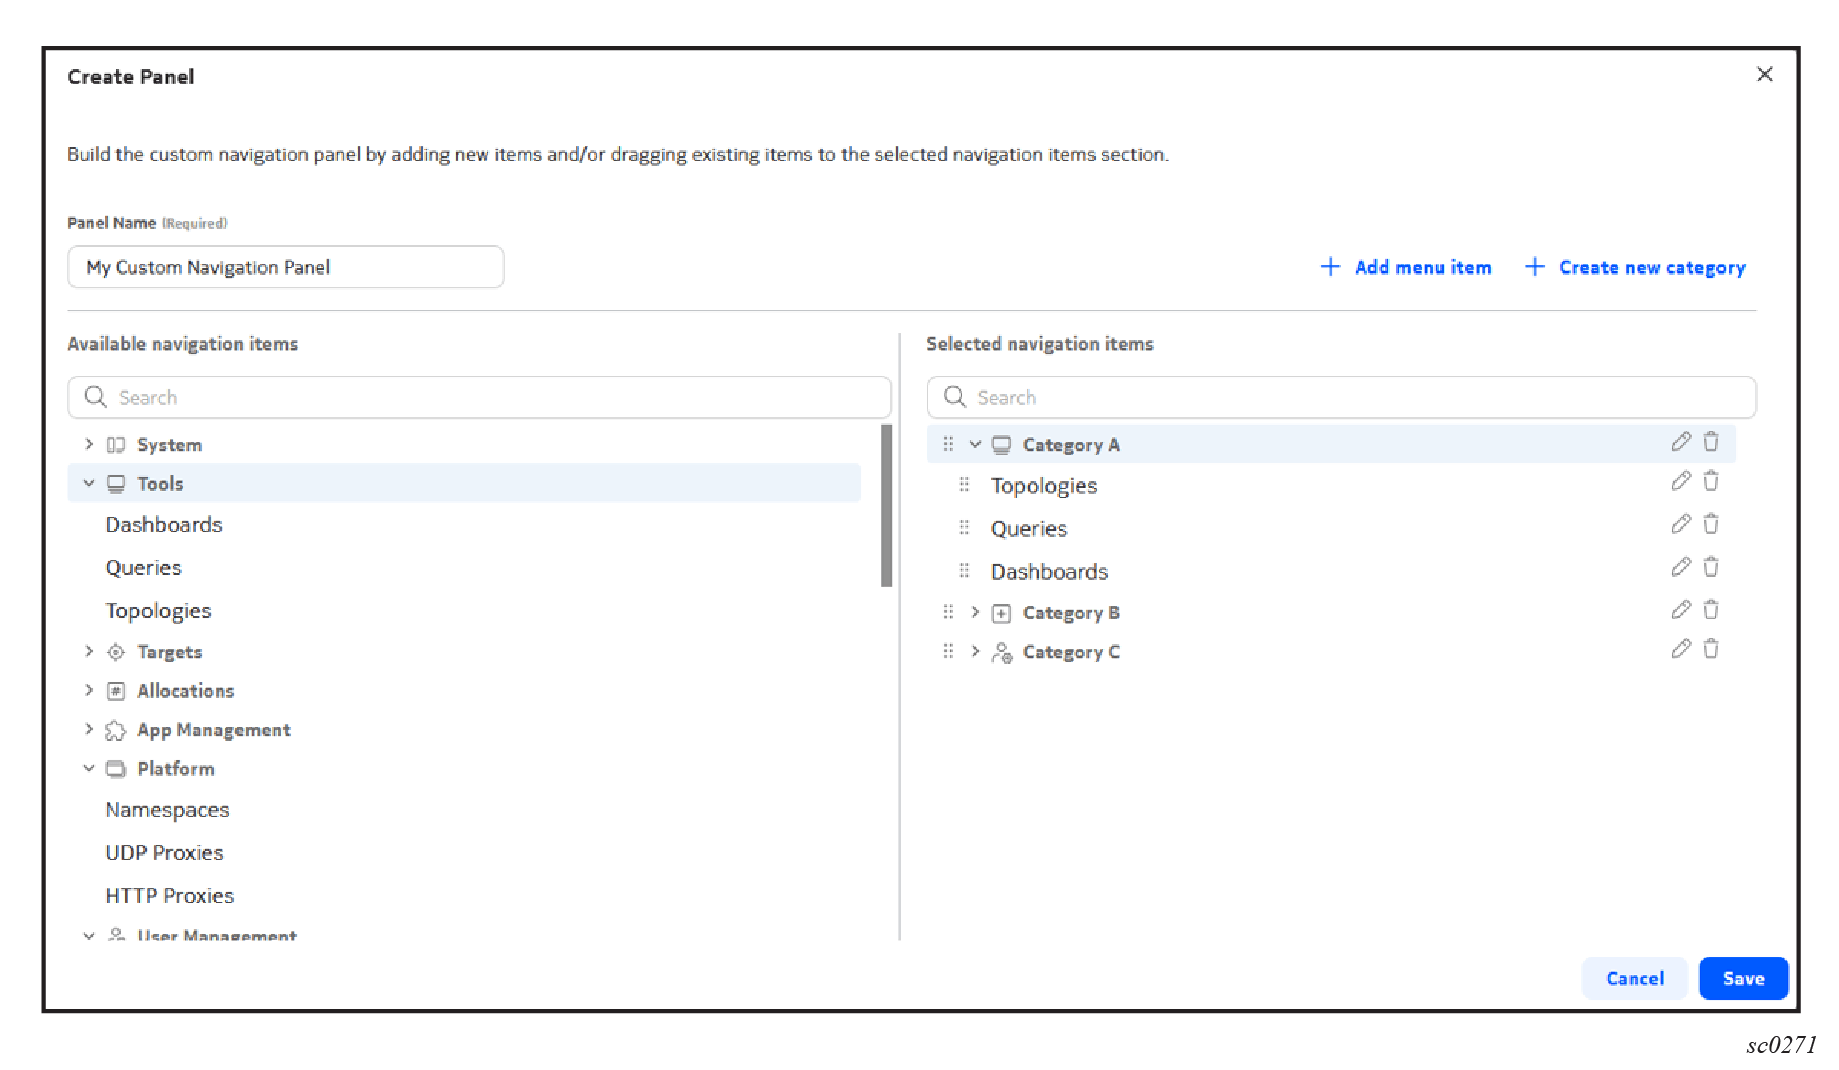
Table: Elements of the Custom Navigation Panel Editor
| Dashlet | Description |
|---|---|
| Panel name | Enter the name to be displayed in the Nokia EDA navigation menu for this panel. |
| Add menu items link | Opens a form on which to define a custom menu item and add it to an existing category within the navigation panel you are designing. |
| Create new category link | Opens a form on which to define a custom menu category with a name and associated icon, and add it to an existing category within the navigation panel you are designing. |
| Available navigation items | A full list of standard Nokia EDA menu categories and their available navigation items. Drag whole categories or individual navigation items to any position within the navigation panel you are designing. |
| Selected navigation items | A preview of the navigation panel you are designing. |
Creating a custom panel #
-
Do either of the following:
-
To build a custom navigation panel from scratch, from the Main navigation panel, click Main and select Create Panel from the drop-down list.
-
To start your design from an existing navigation panel, from the Main navigation, panel click Main and select Manage Panels from the drop-down list. Select a navigation panel from the resulting list, and click Duplicate Panel from the available actions for that selection.
-
-
Enter a name for your panel in the Panel Name field.
-
Add one or more categories from the standard navigation panels into your custom panel.
-
Do either of the following to find your intended category or menu item:
- Expand any of the standard menu categories that are listed under Available menu items to reveal the intended menu item.
- Use the Search field under Available menu items to find a particular category or menu item.
-
Click and drag the category or menu item from the Available menu items to the intended position within your navigation panel design.
Note
If you drag a menu category from Available menu items, all of its menu items are also added to your panel design under that category. These items can be removed, deleted, or rearranged within the Selected navigation items section
-
-
Add one or more custom categories to your navigation panel.
-
Click Create new category to open the Create Category form.
-
Enter a name in the Category Name field.
-
Select an icon to display next to this category in the custom navigation panel.
-
Click Save.
-
-
Add one or more custom menu items to your navigation panel and define their target.
-
Click /+ Add menu item to open the Create Custom Menu form.
-
Select a Category already in your custom navigation panel to contain your menu item.
-
Enter a Custom Menu Name for your menu item.
-
Specify the target page for the custom link by providing a URL in the Custom Menu Link field. Both internal and external links are supported.
-
For an internal link, click the Custom Menu Link drop-down list and select an existing page in the Nokia EDA GUI from the displayed list. Some internal links require additional configuration:
-
Alarms: Delect a Screen Name to identify the specific Alarms page to display. If navigating to the alarm list screen, optionally enter a EQL expression to filter to set of alarms displayed. Click Validate to confirm the EQL expression is valid before saving the custom menu item.
-
Dashboard: Use the Available Dashboards drop-down list to select an existing dashboard as the link target.
-
Query: Enter and validate an EQL query.
-
Merge Requests: Optionally enter and validate an EQL expression to filter the Merge Requests lists.
-
Role-Based Access Control: Select a Screen Name to identify the specific User Management page to display.
-
Resources: Select a Group, Version, and Kind in the GVK Definition field to specify the target resource. Select a Screen Name to identify the specific Resources page to display; the default screen is the resource list view. Optionally enter and validate an EQL expression to filter the resource list.
-
-
For an external link, click the Custom Menu Link drop-down and select External to display the URL Endpoint field. In this field, enter our external link as a URL. For example: https://docs.eda.dev/.
-
-
Use the Open link in new tab check box to indicate whether the target page should replace the current tab, or open a new tab when it opens.
Note
External links always open in a new tab.
-
Click Save.
Your custom menu item is added to the navigation panel design, under the category you selected.
-
-
To remove a category or menu item from your navigation panel design by clicking the trash icon next to that item in the Selected menu items list.
Note
This action is most useful if you began by duplicating another, complete menu from which you would like to trim some items.
-
To edit a category or menu item in your navigation panel design, do the following:
-
Click the pencil icon next to that item in the Selected menu items list.
-
In the resulting Edit form, do any of the following:
-
For a category: edit the category name or change the associated icon.
-
For a menu item: change any of the properties of the menu item, including:
- Category
- Custom Menu Item Name
- Custom Menu Link
- 'Open link in new tab' option
-
-
Click Save.
Managing panels #
To manage existing standard and custom navigation panels:
-
Open the drop-down menu at the top of the navigation panel and click Manage Panels.
-
Find the navigation panel you want to work with in the resulting list.
-
Select one of the following actions from the "..." menu:
- Duplicate an existing standard or custom navigation panel
- Hide or Show an existing standard or custom navigation panel
- Edit an existing custom navigation panel
- Delete an existing custom navigation panel
- Publish your custom panel to share it with other EDA users
- Export a custom navigation panel as a JSON file
Note
Published panels are available to all users who have read access to shared user storage. The ability to see or edit shared panels can be managed through a Cluster Role URL Rule for the path /core/user-storage/v2/shared/**.
Note
You cannot edit or delete the standard Main or System Administration navigation panels.