Workflows#
The concept of a workflow is typically used in automation platforms to make an operational task reproducible; it is the logic or code required to execute the task. Workflows might perform node upgrades, validate connectivity in a virtual network, or performing a simple ping test.
In Nokia Event-Driven Automation (EDA), workflows are container images that take some input, perform some work, and provide some output. Like Nokia EDA resources, the input and output schema for Nokia EDA workflows are defined as a Kubernetes CRD (Custom Resource Definition). These 'Workflow Definitions' and associated container images are packaged in Nokia EDA apps.
Nokia EDA workflows support:
- Reporting runtime 'stages' - Indicating the workflow's steps and their current state
- Reporting a status on workflow completion
- Waiting for user input
- Subflows - A workflow can trigger child workflows
- Artifacts - A workflow may return artifacts, such as tech support files
- Log steaming - Workflow container logs are retrievable via Nokia EDA UI and API.
FlowEngine#
Nokia EDA FlowEngine is the controller behind the instantiation, status reporting, and interaction with workflows.
On creating a new workflow, the FlowEngine:
- Validates the resources input against schema.
- Publishes a Kubernetes
Job, which runs the container image associated to the workflow. - Assigns a Flow ID to the workflow.
- Updates the status of the flow based on gRPC interactions from the workflow container.
Flow IDs are incremental. In the event of FlowEngine restart, previously executed or currently running flows are lost and a new Flow ID restarts at 1.
Note
To avoid excessive memory use by FlowEngine, Nokia EDA enforces the following:
- Only 256 parent workflows are persisted.
- New workflows push out old workflows.
- There is a limit of 256 concurrently running workflows. New workflows are rejected if the system has reached this limit; actively running workflows are never dropped.
- This history includes stages and logs. This history persists for the lifetime of FlowEngine. It does not persist and does not remain after a restart.
Workflows in the Nokia EDA UI#
Workflow Definition List #
The Workflow Definition List page shows all available workflow definitions provided from Nokia EDA apps. From the Main navigation panel, click Workflows under the SYSTEM group. Then, select Workflow Definition List from the drop-down list.
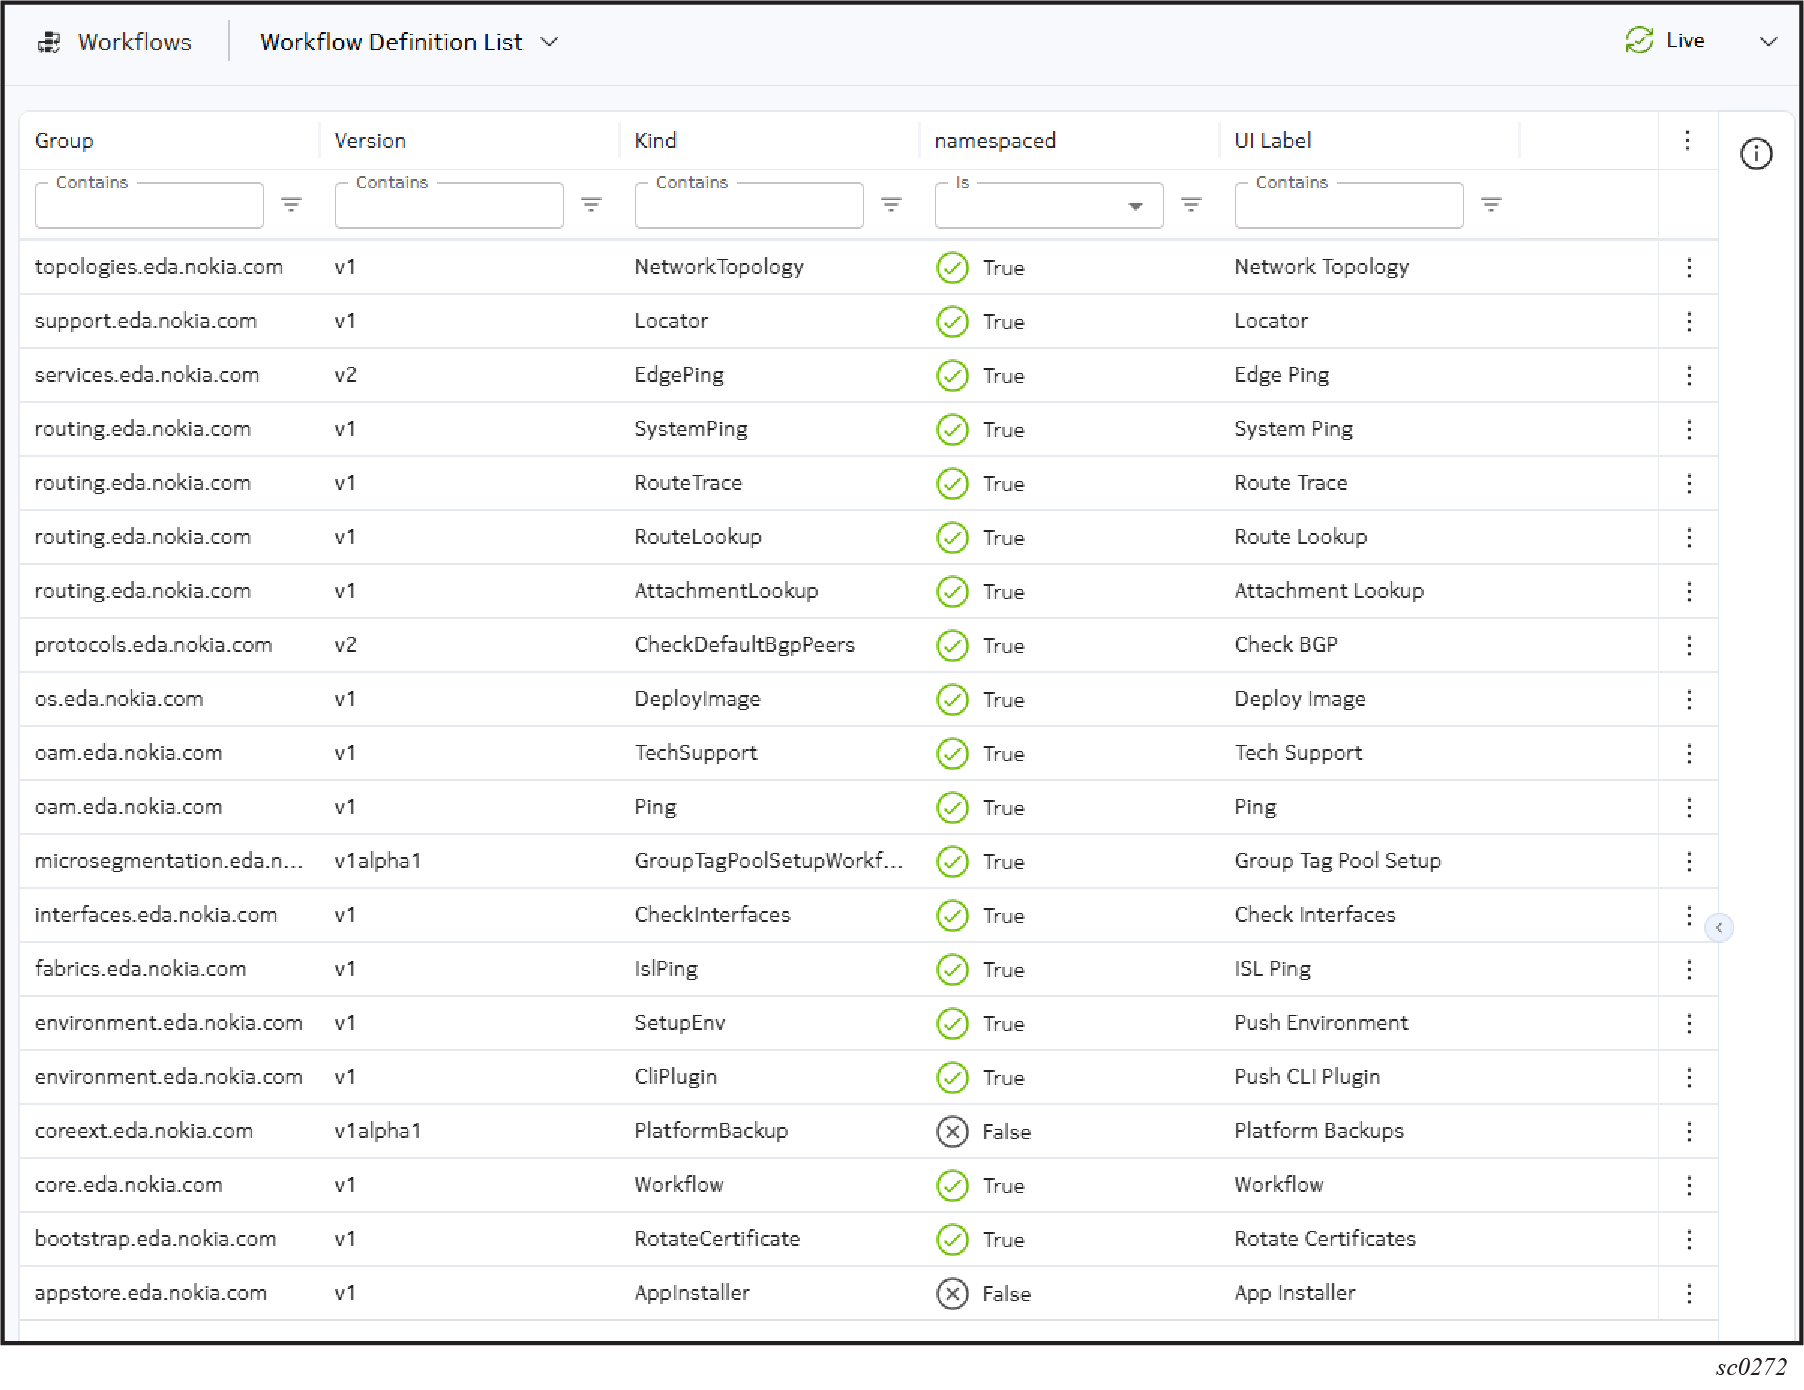
The following table summarizes some of the workflow definitions shipped with the Nokia EDA apps.
Table: Workflow definitions
| Workflow definition | App Name | Description |
|---|---|---|
| App Installer | EDA Store | Used to install or delete Nokia EDA apps. |
| Attachment Lookup | Routing | Used to look up attachments (where an address is attached in the network) on a set of nodes. The output shows the matching attachments, including the node, network instance, prefix, interface, and next hop group ID. |
| Check BGP | Protocols | Checks the state and status of the BGP peers that match the selection criteria. |
| Check Interfaces | Interfaces | Used to check the state and status of the matched notes. Use interface selectors to select target interfaces on which to run this workflow. |
| Edge Ping | Services | Used to initiate a ping to an edge interface resource; specify a gateway or edge mesh. |
| Image | Operating System | Used to upgrade or downgrade software images on specified targets. This workflow can be used directly on a target or list of targets, or with selectors to select targets through labels. It also supports tranches, which are groups of targets that can be upgraded together. By default, the system runs a set of checks before and after the image change; you can upgrade this behavior by setting the Checks field. This workflow also supports canary nodes, which are used to test images before a broader roll out. Canary nodes are upgraded before any other targets. To identify the canary nodes, use node selectors that match labels on TopoNode resources, including those in the list of nodes to be imaged. |
| ISL Ping | Fabrics | Used to ping inter-switch links (ISLs) to verify connectivity within a fabric. You can specify a list of fabrics, ISLs, or selectors for both to match ISLs. This workflow shows the results of the pings, including the status of each ISL. |
| Locator | Support | Typically used to guide on-site technicians to the correct target requiring maintenance; enables the LED locator for a target. |
| Network Topology | Topologies | Performs create, replace, and delete operations for topology resources. |
| Ping | OAM | Performs a ping to an address on a node or a set of nodes. |
| Push CLI Plugin | Environment | Used to push a CLI plug-in to a node. For SR Linux, the plug-in that you specify must include the .py extension, without leading slashes, for example, "myplugin.py". |
| Push Environment | Environment | Used to set up the global environment on a node. For SR Linux, this results in an overwrite of the /etc/opt/srlinux/env file. |
| Route Lookup | Routing | Used to look up routes on a set of nodes. The output shows the matching route and the set of ingress interfaces used to reach it. |
| Route Trace | Routing | Used to trace routes for specified targets. |
| Tech Support | OAM | Generate technical support packages for a node or set of nodes; typically used for debugging. |
| Workflow | Core | A generic workflow definition. This workflow is used by some workflows to create subflows without a predefined schema. |
Workflow Executions list #
The Workflow Executions page lists the in-progress and historical workflow runs.
From the Main navigation panel, click Workflows under the SYSTEM group. Then, select Workflow Executions from the drop-down list.
Any workflow waiting for user input is highlighted in yellow.
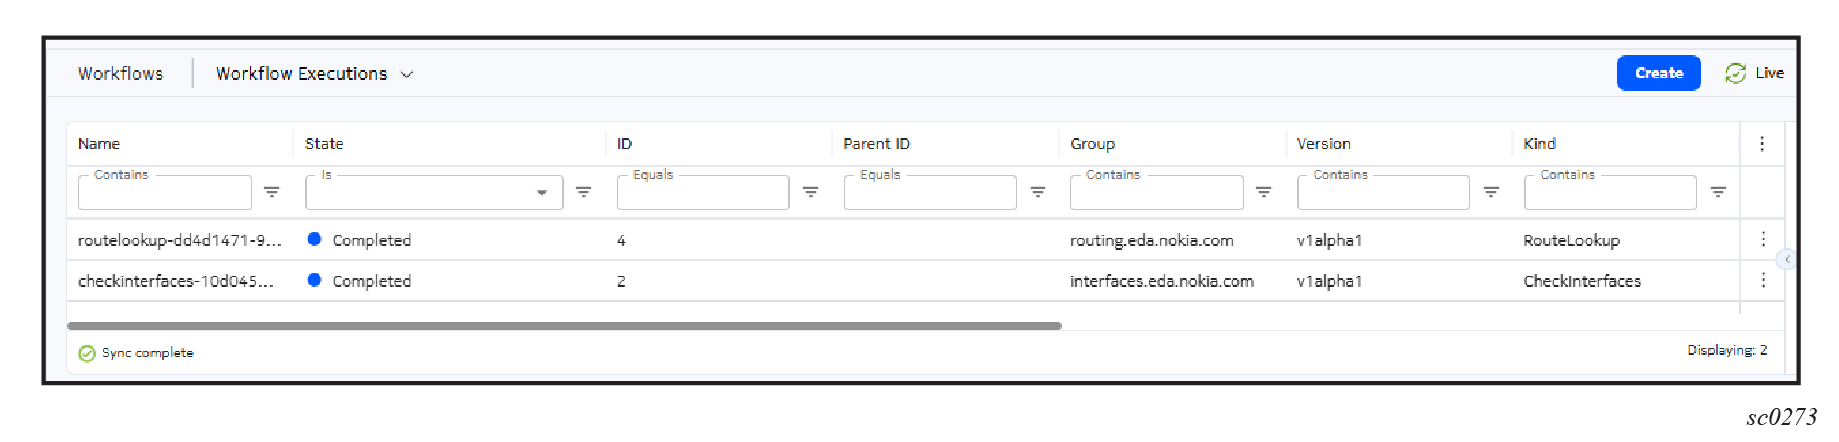
From Workflow Executions page, you can:
- provide additional input for a workflow, if user input is required
- create and run a new workflow
- cancel a running workflow
- display the Summary page for a workflow
Double-click a row to display the Summary page for the workflow.
Displaying subflows#
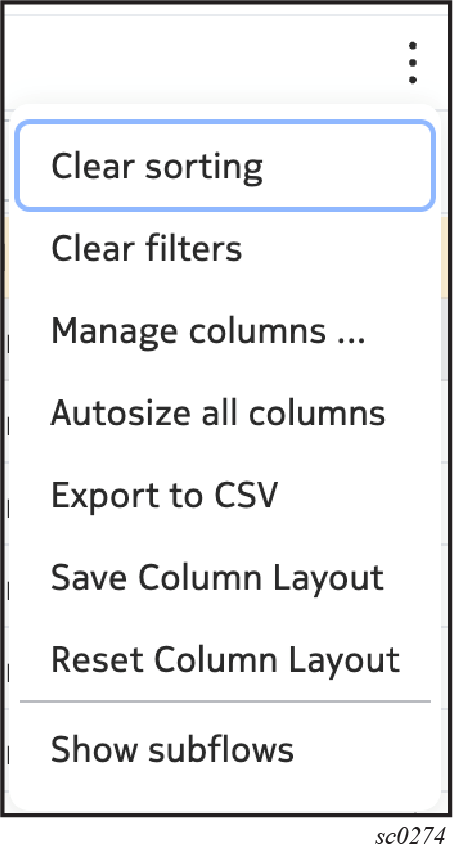
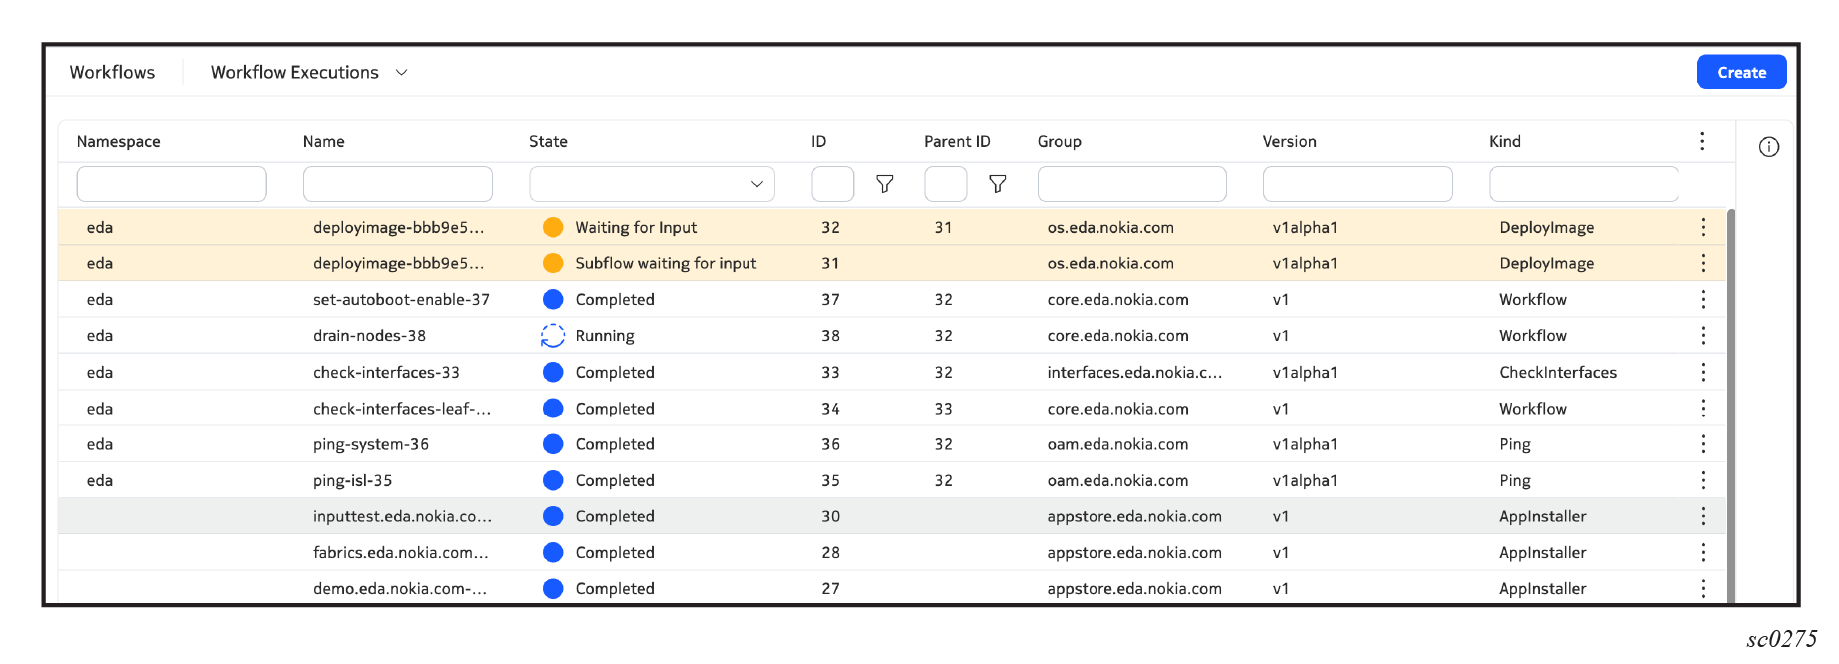
By default, only top-level workflows are displayed. To display subflows, click the Table settings & actions icon and select Show Subflows.
The system displays only the workflows with subflows. For example:
Workflow Summary page #
The Summary page provides details about a workflow execution. Click any workflow in the Workflow Executions page to display its summary.
The following example is for a DeployImage workflow.
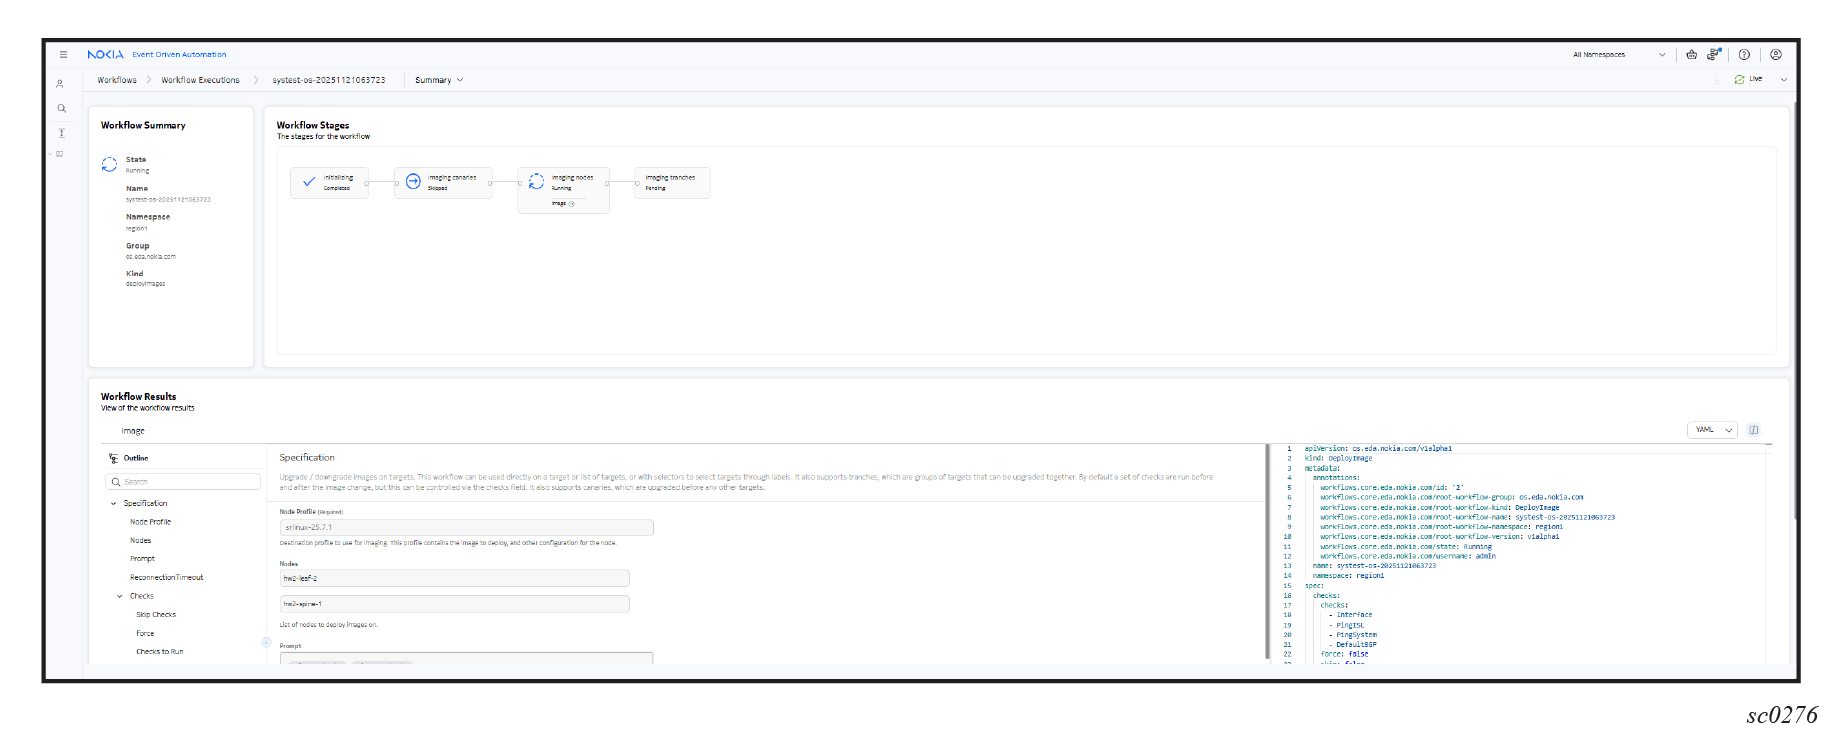
The Workflow Summary panel provides the status of the workflow, name, namespace, category, and type of workflow.
- Status of the workflow, which can be one of the following:
- Waiting to start
- Running
- Completed
- Failed
- Terminated
- Waiting for input
The Workflow Stages panel shows the progress of workflow and the status of the workflow as it passes through the stages. If the workflow has subflows, a link to the subflow's summary page will appear under the related stage.
The Workflows Results panel provides details of the workflow results, including the specification (input) and status (output) of the workflow that was executed.
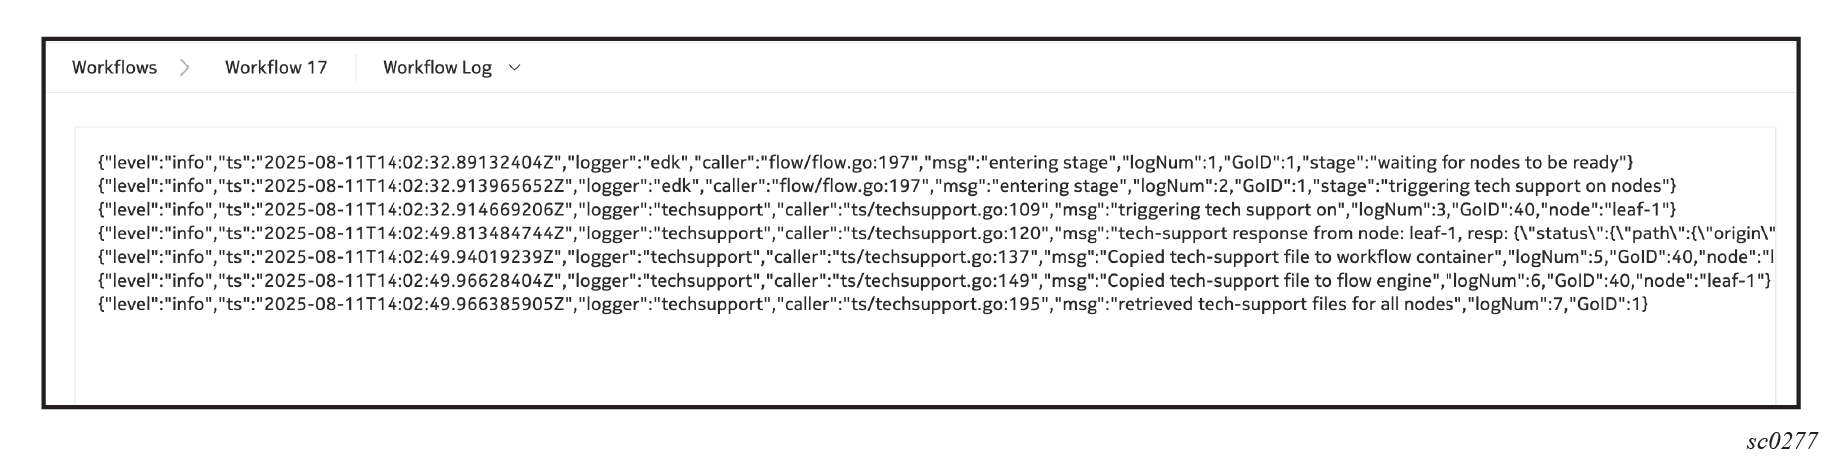
Workflow logs#
The Workflow Logs view display logs from the workflow container. From the Summary drop-down list, select Workflow Log. The logs are used for troubleshooting and debugging purposes.
Workflow artifacts#
The execution of some workflows produce artifacts that you can download. If a file is available for download, the download button is visible from the Workflow Summary page. Click it to download the artifact and save the file locally.
Running workflows #
You can create a workflow using one of the following procedures:
- Running a workflow from the Workflow Definition List page
- Running a workflow from the Workflow Executions page
- Triggering a workflow from the resource action menu
Running a workflow from the Workflow Definition List page #
You can run a workflow by creating another instance of that kind of workflow and running it.
Procedure
-
Select the workflow definition that you want to run by double-clicking it or clicking Run from the Table row actions icon.
-
In the form that displays, fill in the values for the workflow.
The contents of the form vary depending on the workflow definition selected. The Nokia EDA UI auto-generates a unique name for the workflow execution. You can override this name with a custom name.
-
Click Run.
Running a workflow from the Workflow Executions page #
You can create a new workflow by selecting the type of workflow that you want or by duplicating an existing workflow and updating the prepopulated specifications.
Procedure
-
From the Main navigation panel, click Workflows.
-
Click Workflows Executions from the Workflows drop-down list.
-
You can create a new workflow or duplicate an existing one.
-
Create a new workflow.
- Click Create.
- Select the workflow that you want to run from the drop-down list.
-
In the form that opens, enter the specifications for the workflow.
The contents of the form vary depending on the workflow definition that selected. Nokia EDA auto-generates a unique name for the workflow execution. You can override this name with a name of your choice.
-
Duplicate an existing workflow.
-
Locate the workflow that you want to duplicate and click Duplicate from its Table row actions menu.
The prepopulated form displays.
-
Update the specifications for the workflow as needed.
- When you are finished entering specifications for the workflow, click Run.
-
-
Triggering a workflow from the resource action menu #
You can run a workflow from the Row action menu of target resources.
Workflow definitions define some types of resources as subjects. These workflows are listed in the action menu of the relevant resources. For example, the Ping workflow accepts a node as subject and can be triggered from the node action menu:
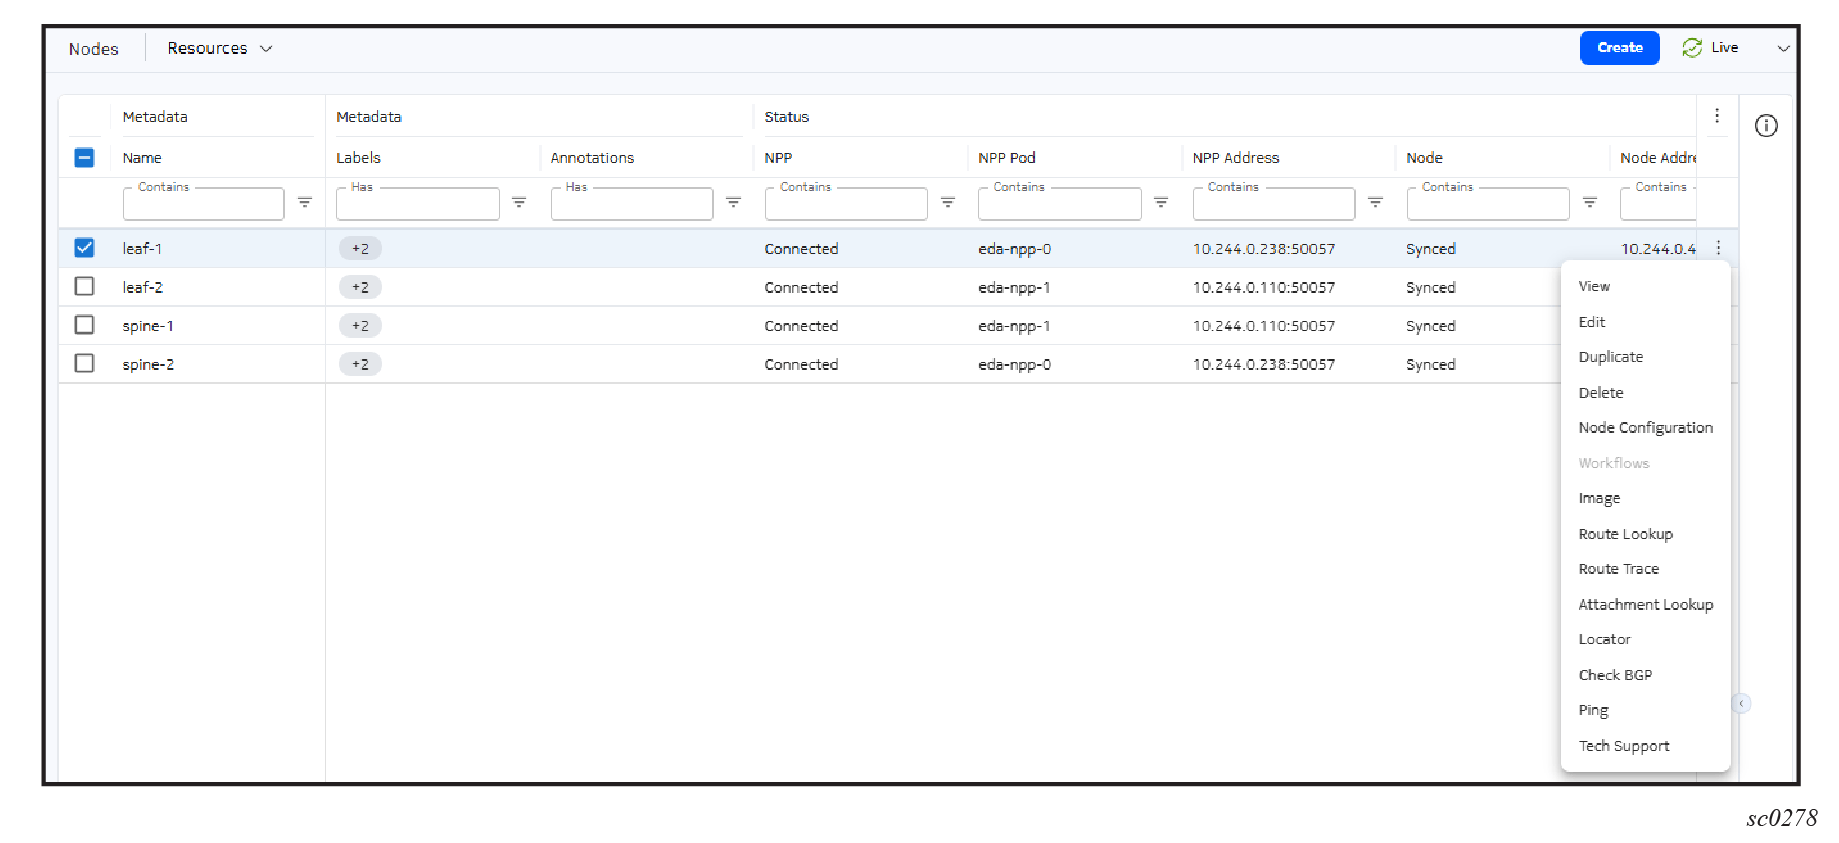
Some workflows allow you to select multiple resources in the same workflow. For example, for the Image workflow, you can identify multiple Node resources. You cannot include resources from multiple namespaces in the same workflow input. The bulk workflow actions function is disabled when the UI page is in set to All Namespaces.
The following example executes the Ping workflow.
Procedure
-
From the Main navigation panel, under TARGETS, click Nodes.
-
Select Resources from the drop-down list.
-
Locate the resource and select Ping from the **Table row actions**menu.
-
In the form that opens, fill the specifications for the workflow, such as the destination address.
The contents of the form vary depending on the workflow definition that you select.
-
Click Run.
Using workflows with edactl #
You can use the edactl command to provide input so a workflow can proceed or to query Nokia EDA about workflows.
Workflow status#
Use the following edactl commands to get a workflow's status:
-
To view all workflows, use the following command:
For example:
-
To view details of a specific workflow, use the following command:
For example:
Workflow logs#
Use the following edactl commands to get workflow logs:
-
To view logs for a workflow, use the following command:
For example: edactl workflow logs 20
-
To tail log output of a running workflow, using following command:
Workflow artifacts#
Use the following edactl commands to get workflow artifacts:
-
To list files associated with a specific workflow, use the following command:
For example:
-
To download all files associated with the workflow in present working directory, use the following command:
For example:
-
To download all the files associated with the workflow in the
/tmp/directory, use the following command:For example:
-
To download a single file associated with the workflow in the
/tmp/directory, use the following commands:or
For example:
Providing input to workflows#
Some workflows may require user input to allow the workflow to proceed. You can use the following commands to handle workflows that require user input:
-
To find workflows awaiting input, use the following command and look for status 'WAITING_FOR_INPUT':
-
To acknowledge a workflow and allow it to continue, use the following command:
For example, to acknowledge the workflow whose ID is 10:
-
To terminate a workflow, use the following command:
For example, to terminate the workflow whose ID is 20: